CENTRAL VACUUM HELP & SUPPORT
Central Vacuum Troubleshooting Guide
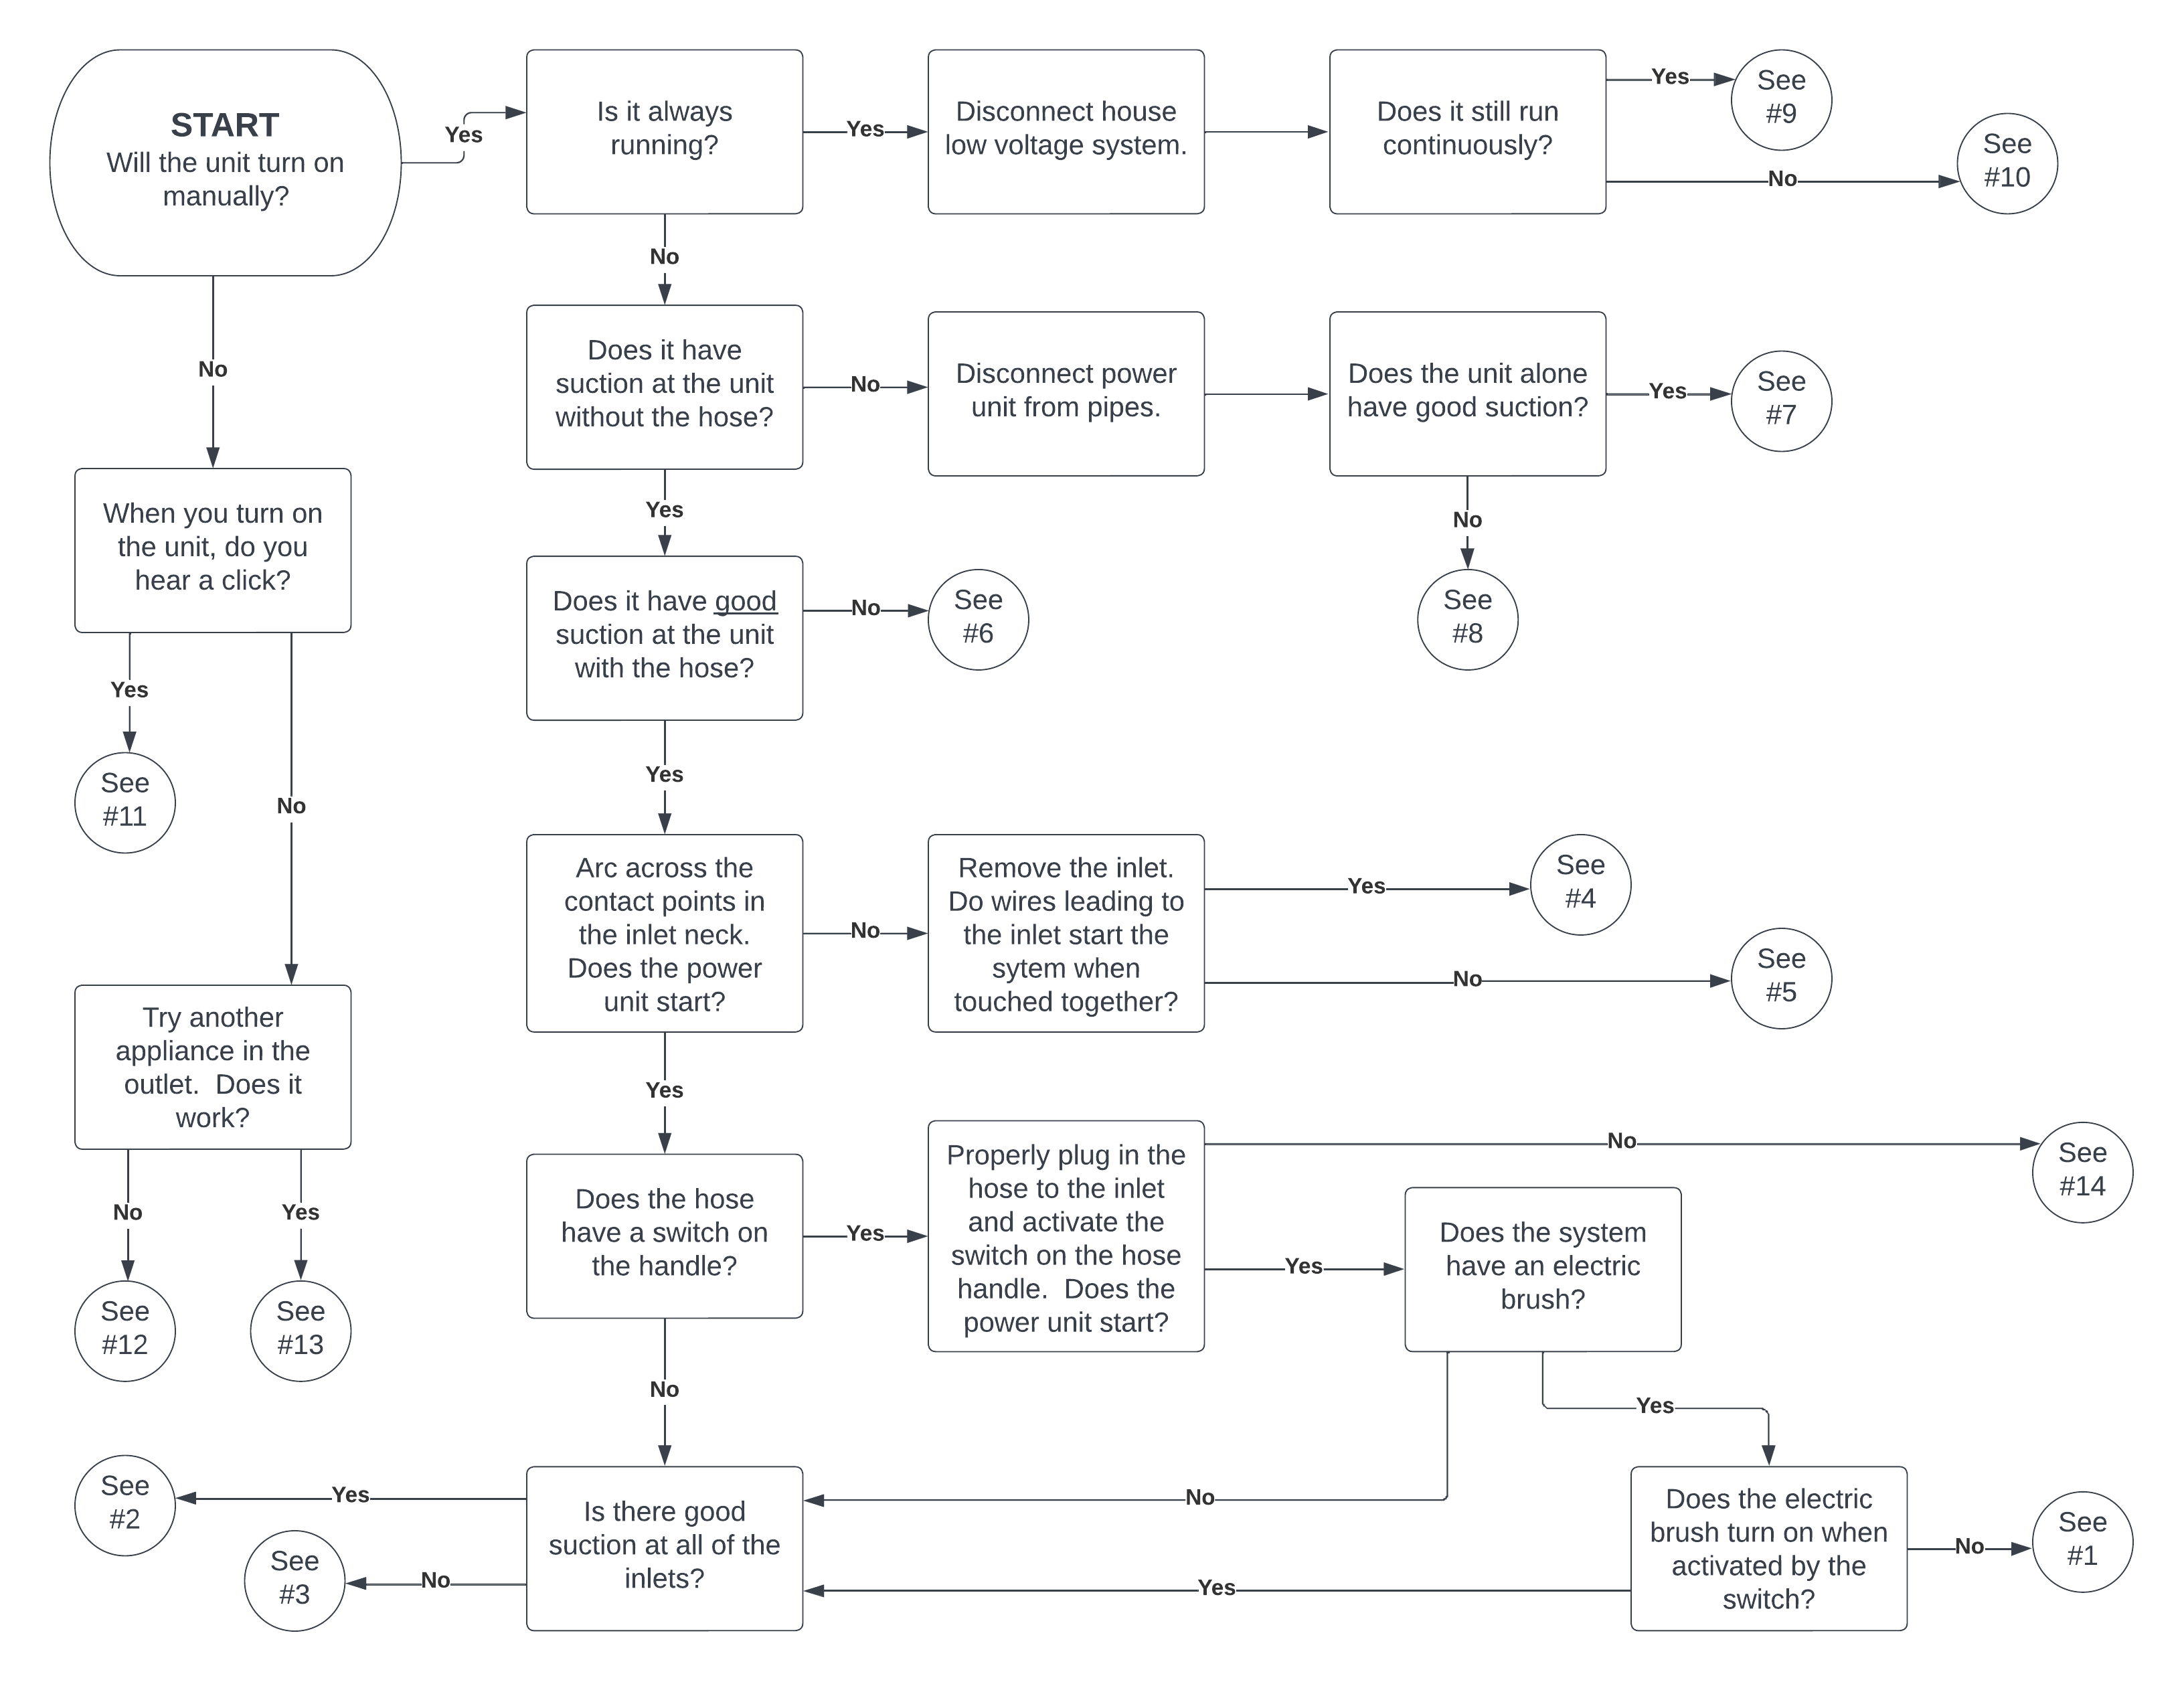
Having trouble with your central vacuum system?
Use the troubleshooting flowchart below to help identify
the problem, then select the corresponding number for
possible causes and solutions.
Safety First:
Disconnect your central vacuum power unit from electrical
power before inspecting, servicing or replacing components.
Troubleshooting involving household voltage, motors, relays,
transformers or internal electrical components should be
performed by a qualified technician if you are not experienced
with electrical repair.
01
Electrical Failure
-
If your system uses Supervalves, check whether
the power brush operates when connected directly
at the valve. If it does, the problem may be
within the electrical portion of the hose.
-
Check the power brush reset button and inspect
the brush for an issue with the neck tilt switch.
-
Inspect the connections between the hose,
wand and power brush.
-
If the problem appears to involve household
voltage at a Supervalve or Electravalve, have
the electrical supply checked by a qualified
technician.
-
Also review troubleshooting section #14 for
possible hose-related problems.
02
Clog Somewhere Else in the System
- Check the power brush for a blockage.
- Check the wands for a blockage.
-
Check the hose and other cleaning attachments
before assuming the blockage is inside the
home's vacuum tubing.
03
Clog in Vacuum Tubing
A blockage inside the home's central vacuum piping
may require several steps to locate and remove.
-
Check the fitting immediately inside the affected
inlet and the piping near the power unit for
visible debris.
-
Determine whether the problem affects one inlet,
several inlets or the entire system. This can
help narrow down the location of the blockage.
-
Applying suction from the opposite direction
with a suitable vacuum can sometimes help
dislodge a blockage.
-
Temporarily covering and releasing the end of
the hose can create changes in airflow that
may help loosen some obstructions.
-
After clearing a suspected blockage, test all
affected inlets to confirm that airflow has
been restored.
-
If the obstruction cannot be cleared using
normal methods, the location of the blockage
may need to be identified so the piping can
be professionally accessed and repaired.
-
Underground vacuum lines can sometimes develop
problems caused by moisture, debris or damage
to the pipe.
-
Consider whether recent construction,
remodeling, hanging pictures, installing
shelving or other work could have damaged
or obstructed a vacuum line.
-
Check the piping layout for improperly installed
fittings or other installation problems.
04
Bad Inlet
-
Determine whether the existing inlet uses the
same type of contact system as the replacement.
-
Some older inlet configurations may operate
differently and require compatible components.
-
When replacing an inlet, inspect how the
original inlet was sealed to the tubing.
-
After installation, listen for air leakage
around the inlet. A hissing sound may indicate
that the inlet is not properly sealed.
05
Low-Voltage Wire Cut or Damaged
-
Consider whether recent construction or
remodeling may have damaged the low-voltage wire.
-
Check for signs of damage caused by rodents.
-
If the power unit is located in a detached
garage, consider whether recent digging or
exterior work may have damaged the wiring.
-
Inspect accessible low-voltage connections
at the power unit and inlet locations.
-
Damaged low-voltage wiring may need to be
repaired or rerouted between a working portion
of the system and the affected inlet.
06
Clog in the Vacuum Hose
-
Disconnect the hose and inspect both ends for
a visible obstruction.
-
Applying suction from the opposite end of the
hose can sometimes pull the obstruction back
out.
-
Avoid using sharp objects that could puncture
or damage the hose.
-
If the obstruction cannot be safely removed,
contact us for assistance before damaging
the hose.
07
Power Unit Is Good, but the Pipes Have Leaks
-
Consider whether recent work has been performed
on the home near the vacuum piping.
-
Check whether any inlet has recently been
removed or reinstalled.
- Inspect inlet covers for damage.
-
Check for a hidden or forgotten inlet that
may have been left open.
-
If you have floor inlets, inspect accessible
piping for a loose or disconnected connection.
-
With the system operating, listen around
accessible areas for an obvious air leak.
-
Underground piping may have been damaged by
landscaping, digging, tree growth or other
exterior work.
08
The Power Unit Has Poor Suction
-
On multi-motor power units, a motor failure
can result in reduced suction.
-
Inspect accessible gaskets and the power-unit
housing for obvious air leaks or damage.
-
Check filters and screens for excessive
accumulation of dust or debris.
-
Check the exhaust system for an obstruction
or excessive restriction.
-
Fine construction or plaster dust can quickly
restrict filters in filtered or bag-style
central vacuum systems.
-
If the problem appears to involve a motor,
electrical supply or internal wiring, contact
a qualified service technician.
09
Possible Short in the Power Unit
A suspected electrical short inside the power unit
should be diagnosed by a qualified service technician.
Disconnect the power unit and contact us for assistance.
10
Short in the Low-Voltage System
-
Consider whether recent attic, crawlspace,
construction or remodeling work may have
damaged the low-voltage wiring.
-
Check accessible wiring for signs of damage
from rodents.
-
Inspect accessible low-voltage splices and
connections.
-
If damaged wiring cannot be located or repaired,
a new low-voltage wire may need to be routed
to the affected portion of the system.
11
Power Unit Receives a Start Signal but Does Not Run
This condition may indicate a problem with the motor,
motor brushes, relay, breaker or internal wiring.
Because diagnosis requires access to internal
electrical components, disconnect the power unit
and contact a qualified technician for testing
and repair.
12
The Power Unit Is Not Getting Electricity
- Check the home's circuit breaker.
-
Verify that the electrical outlet supplying
the power unit is working.
-
Consider whether other equipment on the same
circuit may be causing an overload.
-
If the outlet, circuit or electrical supply
appears to be the problem, have it inspected
by a qualified electrician.
13
Transformer or Motor Not Receiving Power
This condition may involve the power cord,
transformer, relay or another internal electrical
component.
Disconnect the central vacuum from electrical
power and have the unit diagnosed by a qualified
service technician. Do not bypass or bridge
electrical components for testing.
14
Low Voltage in the Hose Is Not Working
-
If the hose-handle switch feels unusually
soft or "mushy," the switch may need replacement.
-
With the hose disconnected from the system,
inspect accessible hose-handle contact points
for lint or debris.
-
Make sure the hose is fully inserted into
the wall inlet.
-
If the hose still does not operate correctly,
the hose or its electrical components may
require repair or replacement.
STILL HAVING TROUBLE?
Let Our Central Vacuum Experts Help
If the troubleshooting guide didn't solve your problem,
give us a call. We can help identify the issue, locate
replacement parts or determine whether professional
service is the best next step.
|